
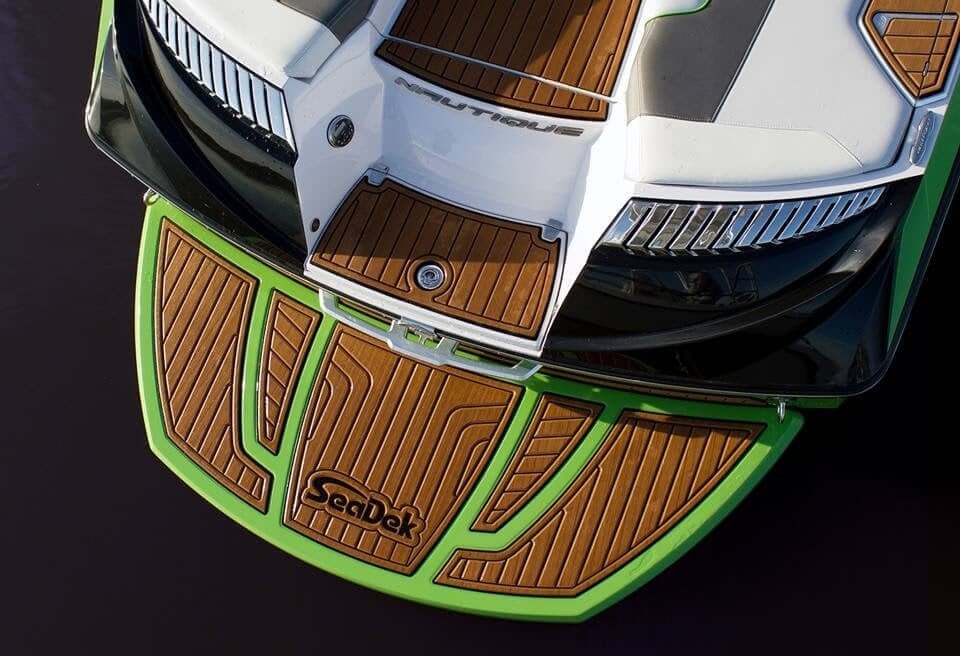
DIY Boat Flooring | A SeaDek Installation Guide
Posted by Ryan Sacksteder on May 23rd 2025
The idea of DIY boat flooring might seem intimidating to some, but in all honesty, it isn't the least bit challenging. It might even be quite enjoyable - after all, there are worse ways to spend a couple of hours than upgrading your pride and joy on the marina. Browse our SeaDek installation guide and see how quickly you can transform your boat into the most comfortable, eye-catching vessel on the water this season!
Seadek marine flooring was designed so that you can install it yourself, without pulling your hair out or launching a pair of scissors into the harbor out of sheer frustration. While not completely effortless, the process is surprisingly straightforward—you'll see for yourself.
However, while installing SeaDek yourself is one of the easier boat upgrades you can do, you need to follow basic guidance. Wing it, and it may take longer than it needs to.
Seadek Marine Flooring Installation Tips & Steps
We've assembled this practical SeaDek installation guide specifically to help boat owners like you handle the installation process with ease and confidence. Within a couple of hours, you will probably wonder why you didn't try it earlier (depending on the size of your boat, of course).
Before addressing how to install our DIY boat flooring, we just need to cover a few basic tool requirements - then we will get straight to it, step-by-step.
Marine Flooring Installation Tools
|
✔️Clear vinyl film ✔️Sharpie marker ✔️Masking tape & Scissors ✔️Isopropyl alcohol or acetone |
✔️Sharp razor knife ✔️SeaDek Flooring ✔️Measuring tape or ruler ✔️Boat Information Sheet |
Step-by-Step Seadek Installation Guide
The following instructions are a quick tutorial for DIY boat flooring. While they should be enough to complete the job successfully (again, this isn't a complicated process), you will find more detailed instructions and even comprehensive video tutorials on our DIY Learning Center. If you prefer a more succinct approach, follow the steps below.
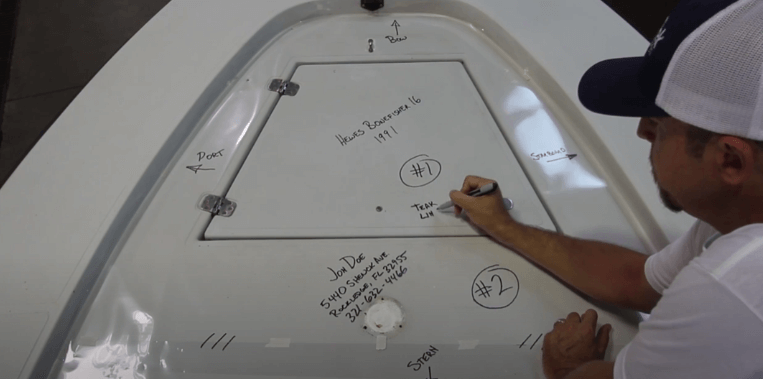
Step 1: Planning and Templating
Before you begin installing SeaDek yourself, you need to create a template for your boat's deck. Accurate templates make installation seamless, reducing stress later.
Start by laying clear vinyl film flat on your boat surface and securing it with masking tape. Carefully trace the deck area - noting hinges, screw holes, and edges clearly - and don’t forget to label the bow, stern, port, and starboard on your template.

Step 2: Ensuring the Perfect Fit
Before committing to installation, always do a dry fit. Cut out your templated shapes, leaving room for adjustments. Position each piece precisely where you intend to install it. Confirm alignments, patterns, and fit. If you need to make adjustments, clearly mark changes on your template now, potentially saving yourself headaches later.
If a piece feels slightly too small, you have two options: either attach some extra clear vinyl or Mylar film to extend the edge and retrace the shape, or simply mark the area that needs to be expanded directly on the film. Either approach works just fine.
If your template includes pattern lines, remember these are used to align the design across different pieces. They are not decorative lines like faux teak. Matching them up helps ensure everything flows smoothly once your SeaDek DIY boat flooring is complete.
Step 3: Take Photos
Once you are happy with the dry fit - or if you have made adjustments - we recommend snapping a few photos while it’s still in place and sending them to your SC Wake contact. If everything looks good, they will give you the green light to move forward.
While this isn't a prerequisite, it makes sense to be extra cautious and make the most of our support. If time is against you and you trust your judgment, you can move on to step 3 without contacting support.
Step 4: Preparing Your Boat Surface
As with most things of this nature, solid preparation is incredibly important. So, thoroughly clean the deck with isopropyl alcohol or acetone to remove contaminants like wax, dirt, or sunscreen - and be as thorough as possible.
Ensure the area is dry before moving on. The goal here is to ensure the SeaDek adheres correctly. SeaDek utilizes an acrylic-based adhesive for a strong bond. It makes for a truly easy peel-and-stick application.

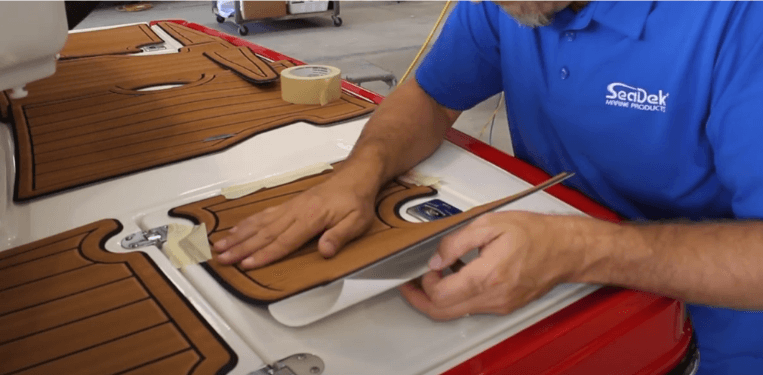
Step 5: Installing Your SeaDek
With your deck prepped and dry fit confirmed, you're ready for installation:
-
Place the SeaDek pieces without removing the adhesive backing to double-check positioning.
-
Turn each piece over and cut the adhesive backing halfway across, from the center to the edges.
-
Peel back a small section (about 2 inches) and fold it to create a tab.
-
Position the pad exactly, securing one side with masking tape.
-
Gently peel back the remaining paper backing, pressing firmly from the center outward to avoid air bubbles.
-
Repeat this process for each piece.
Step 5: Final SeakDek Installation Guide Checks
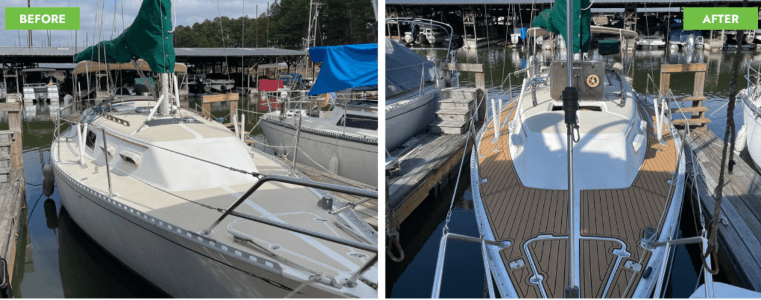
After installing each piece, firmly press down around the edges to seal the pads properly and prevent water intrusion. Thanks to SeaDek’s strong adhesive, your deck is immediately ready for use.
And that's all there is to it. Did we mention it was simple?
Step 6: Optional Hearty Gloating
All that’s left now is to take a step back, put your hands on your hips, and admire the transformation. You did that. It looks incredible, doesn’t it? Brace yourself for an immediate barrage of compliments from your fellow boaters - and a flood of questions about where they can get SeaDek.
Caring for Your SeaDek
Not only did we make our SeakDek DIY boat flooring extremely simple to install, but we also made it easy to maintain. All you need is mild soap, warm water, and a firm brush.
SC Wake Boat Juice is recommended for tougher stains, providing an extra clean finish. Plus, it comes in rather useful for cleaning other areas of your boat, such as foam and vinyl seating areas.
Prefer Professional Help?
Not everyone has the time for boat customization DIY, and that's perfectly understandable. If you lack time or simply don't feel inclined to install SeaDek yourself, we have a network of Certified Installers available to assist.
Our SeaDek installers are factory-trained professionals with actual boating industry experience. They will install your SeaDek efficiently, quickly, and thoroughly, guaranteeing amazing results.
Marine Decking That Looks Great and Performs Even Better
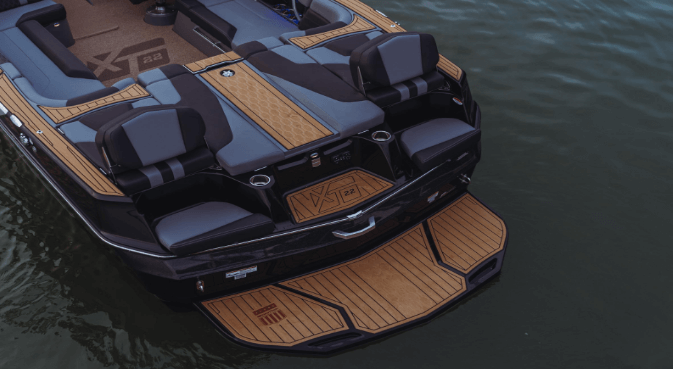
There is a reason why so many boat owners recommend SeaDek once they have fitted it. With our unique DIY boat flooring, you are not locked into boring, generic, plain bumpy non-skid - this is quality marine flooring that puts a head-turning stamp on your boat.
More importantly - apart from the transformative looks - SeaDek gives you a surface that’s beautifully comfortable underfoot, dependably grippy when wet, and extremely forgiving on long days out. It even helps quiet things down, leading to less thud when you drop your tackle box or shuffle around in boots.
Shop for Seadek Marine Flooring
If you possess even the most basic DIY skills (and by that, we mean the ability to use a tape measure and a pair of scissors), then this Seadek installation guide is for you, and you can install SeaDek yourself in a few hours. But remember, we have certified pros on standby who can handle the installation for you if preferred.
Looking for something extra special? We have an incredibly wide range of sizes, textures, and colors available, but if you need something unique, get in touch with SC Wake for our custom SeaDek flooring options.